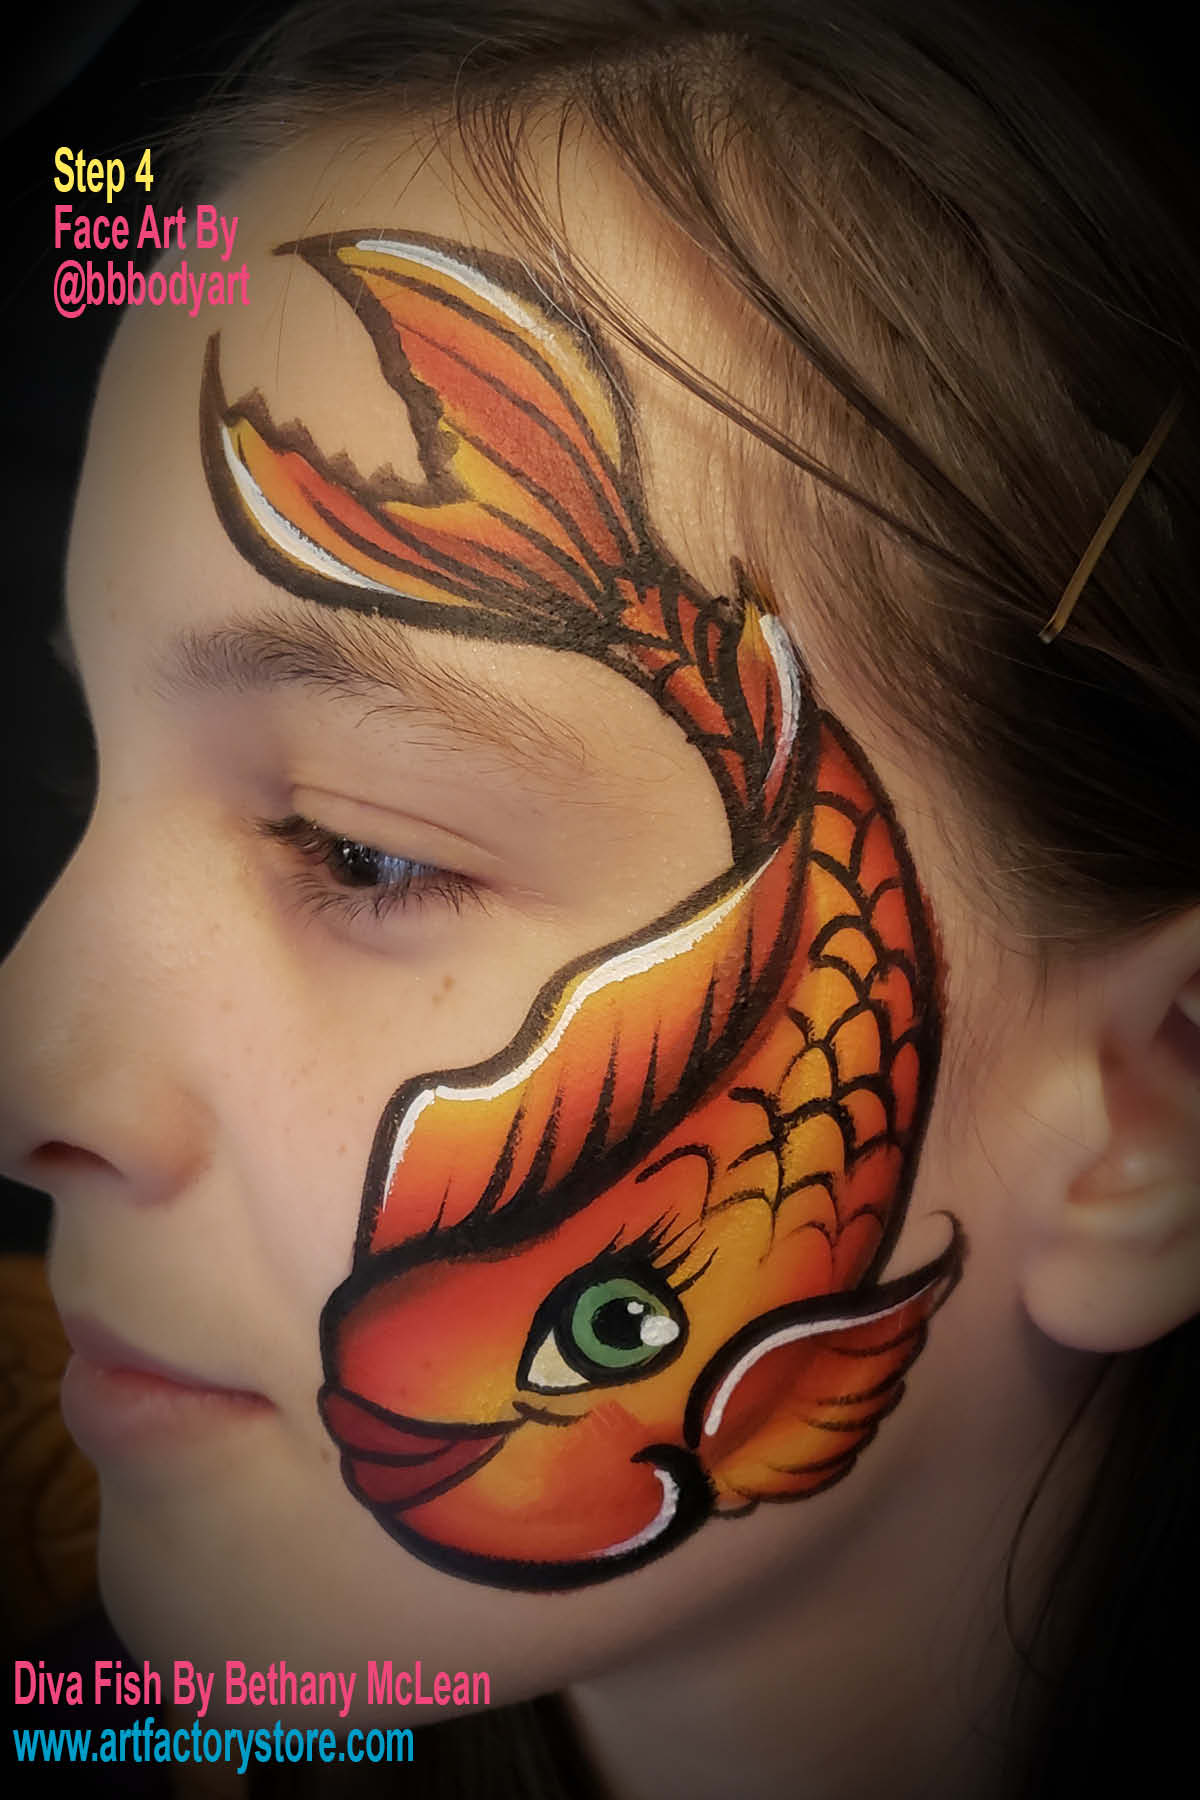
Step-By-Step Diva Fish Tutorial Cheek Design Face Paint
by Bethan McLean
Step 1: Using your favorite one stroke (Global Funstroke Mexico pictured here) and a 3/4 Flat brush, start with your brush parallel to the lips and darkest color on the outside. Go up slightly, and then swoop around the eye. Make sure to keep the brush angled the same as you move it, so when you come across the eyebrow, it will actually be going somewhat sideways, to make the thin part of the stroke.

Step 2: Flip your 3/4 brush over, allowing the lighter color to overlap, and again keeping the brush parallel with the lips, and do the reverse of the first stroke. Move sideways and down as you swoop back around to the head of the fish, overlapping less and less as you go, so the body will be wider than the tail.Turn your brush slightly as you reach the bottom of the stroke to curve that darker color up to meet the mouth area of the fish.
Step 3: Place your 3/4 in flat brush in the middle of the body of the fish up at the tail area above the eyebrow, so that about a third of the brush overlaps the body, lighter color on the outside edge. Gradually wiggle your brush as you make the right side of the tail, until it’s as long as you want it to be, then turn your brush slightly to the right to keep the light color on the outside edge of that side. Repeat in the opposite direction to make the tail complete. Place the flat brush on the top side of the body, dark side touching the top edge to make the dorsal fin. Wiggle your brush slightly as you go along the back, stopping about 3/4 of the way down the body. Flip your brush, and make one angled stroke back towards the head, so that it appears the fin is twisting with the body. A simple leaf shape with your flat brush makes the bottom fin.
Step 4: Using your flat brush, dark color towards the outside edge, make a pronounced jaw for your fish, in a J shape, where the curve of the J is next to the bottom fin. Using a coordinating color (Paradise Red pictured here), make an elongated heart for the mouth. The top lip should overlap the bottom just slightly, and the mouth should curve into a slight smile. Add a white teardrop shape for the eye, and a pupil of an opposite color for contrast (FAB Emerald Green pictured here). Note that it’s good to use a dark shade, as the white will lighten the color.
Step 5: Outline your fish! Using an Art Factory #4 round (possibly my favorite brush ever) and Wolfe Black, define the edges of the body and fins. Make sure the outside edge of the dorsal and bottom fins and the inside edge of the tail fin are scalloped. Notice that the line on the top of the dorsal fin crosses over the fin as it curves around the eye, for a more 3D effect. Add some lines come up from the body and out from the base of the tail to show the spines of the fin. Outline the mouth, separating the lips, and adding a small smile curve at the cheek. Outline and add lashes to the eye.
Step 6: Add the pupil to the eye, and make rows of “m” shapes that stack between each other from behind the eye, up to the base of the tail. Come back with some white (Wolfe white pictured here) and add highlights on the fins, jaw, and most importantly the reflection dots in the eye. For added fun, this fish can be positioned around the mouth, with the lips drawn on the person’s lips!

About the Artist:

Bethany McLean is an award-winning face painter and body artist, working professionally in the Atlanta area for 13+ years. Starting with children’s parties and local events, she has grown her business into a full time career with her work appearing in numerous film and television shows. Her clientele includes Cartoon Network, the Georgia Aquarium, Smirnoff, Q100, 11Alive, The Weather Channel, AMC, Bacardi, 99X, and many more. She continues hone her skills, staying on top of pop culture, makeup trends, and new products to keep providing her clients the highest level of service.

